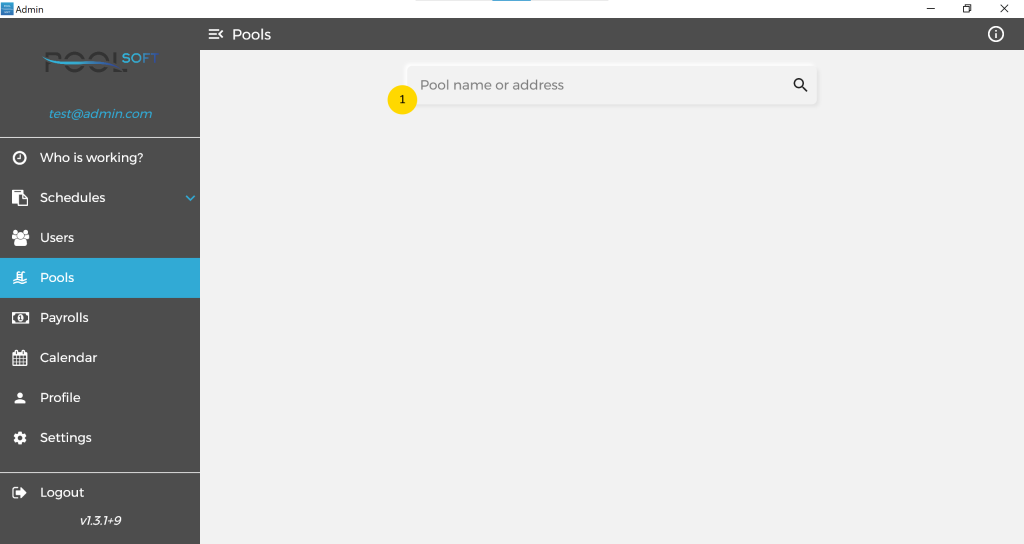
From that screen you have direct access to all pools in the system.
By typing in the form(1*) you can filter all pools by name or address, once you see the desired pool you must click on it to select it.

Once the pool is selected all related information will be visible for you.
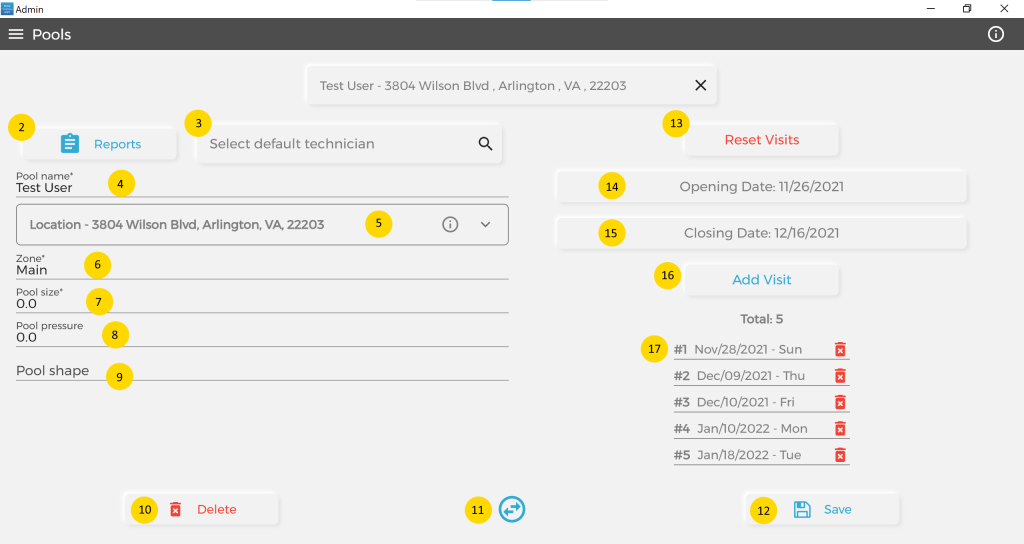
From button Reports(2*) you can open and see all reports created for this pool.
From the “Select default technician” field you can select one of your technicians to be used as default for this pool. This is handy when you are creating a schedule for the day. All planned visits for pools that are with the default technician will be preselected for you, so you can select more or deselect some before to create the schedule.
Pool Name(4*) is a short name that you can use for that pool. It is useful when searching for a pool. This field is also visible to the client!
Location form(5*) is same as for a user, please use it’s own info button for more info.
Zone(6*) is a custom field that indicates to which zone(group) this pool belongs to. On the create schedule screen all pools are grouped by zone. It is handy to see pools that are close to each other or grouped by other criteria defined by you.
Pool size(7*) is in gallons, it may be used in future to calculate needed chemicals according to the measurements.
Pool pressure(8*) and shape(9*) are not required and just informative fields.
Planned dates on the pool are important. According to those you will be able to see which pools must be scheduled for the current day. Also will appear in the calendar, so you can see each day how many visits are planned. These dates will be visible to the client as well on the calendar in the client’s app.
Reste Visits button(13*) is in use at the beginning of the season, when you are about to plan all your visits for it. It will delete current planned visits, opening and closing dates.
Button(14*) is to select when the pool should be visited for opening. Once you assign a date it will check in the system how many openings are planned for this date already and if with the new one is more then the maximum set in the App settings will show a warning message.
Button(15*) is same as (14*) but for closing the pool.
Button(16*) is to add a new visit. Once you select a date it will also check with the system if the allowed maximum is reached and warn you.
You have a list(17*) with all planned visits for the season of the pool. Each visit has a count , date and day of week. You can manually remove any visit on the list from it’s delete button.
Button Delete(10*) will delete this pool with are reports for it.
Button(11*) is to change the pool owner. If you have a new client which just bought a house of another client, then you will register the new client and will change the owner of the pool to the new one, which will be able to see all of the previous reports.
After any change you must click the Save button(12*) to make sure it is saved in the system.